BigBlueButton is open source software and is licensed under the LGPL licence type. The servers run in the university's own University Computer Centre and are therefore particularly data protection friendly.
BBB was primarily designed for use in teaching environments and therefore has a wide range of functions, such as
- Two roles: moderators and participants
- Desktop sharing and presentation of files (e.g. Microsoft Office documents, Open Office documents, PDF documents)
- Active markers/notes directly in the document (e.g. pointer, zoom function and marker function)
- Chat with everyone and private chats
- Report function for participants
- Active muting of all participants
- Recording
- BreakOut rooms
- Activating elements (e.g. live surveys, polls)
There are three ways to access the application:
- StudIP
Please select this access if it is a lecture that has already been created in StudIP. This has the advantage that all participants are automatically authorised for the meeting room. - Greenlight frontend
Lecturers and employees of the Hochschule Wismar University of Applied Sciences choose this access if you are planning a meeting with external participants who do not have a university login (e.g. job interviews, external meetings)
Greenlight frontend: https: //conference.hs-wismar.de - Study groups
For all students who want to exchange information with each other or hold meetings with external participants (e.g. discussion of a Bachelor's thesis with the company). See instructions in the box on the right.
If your camera does not work with BigBlueButton, please test here first:
https://webrtc.github.io/samples/src/content/getusermedia/gum/
whether your camera generally works. If this is the case, please refer to the instructions in the next box "Camera / microphone / echo test not working" to check whether the BigBlueButton servers are authorised to access your devices (camera, microphone, screen).
To use your microphone or webcam, your browser must be authorised to access the device. Normally, you will be asked for permission the first time you use the device. If you have (possibly unconsciously) rejected the use of the device in the browser, your browser will remember this recruitment for the respective server. To resolve this problem, please proceed as follows:
Firefox browser
- Open the "Recruitment" in Firefox and select the menu item "Data protection and security" on the left or simply click on this URL: about:preferences#privacy
- Scroll down to "Permissions"
- There you will find the server-dependent recruitments for your devices (e.g. camera and microphone)
- Allow access for the corresponding servers to the corresponding devices

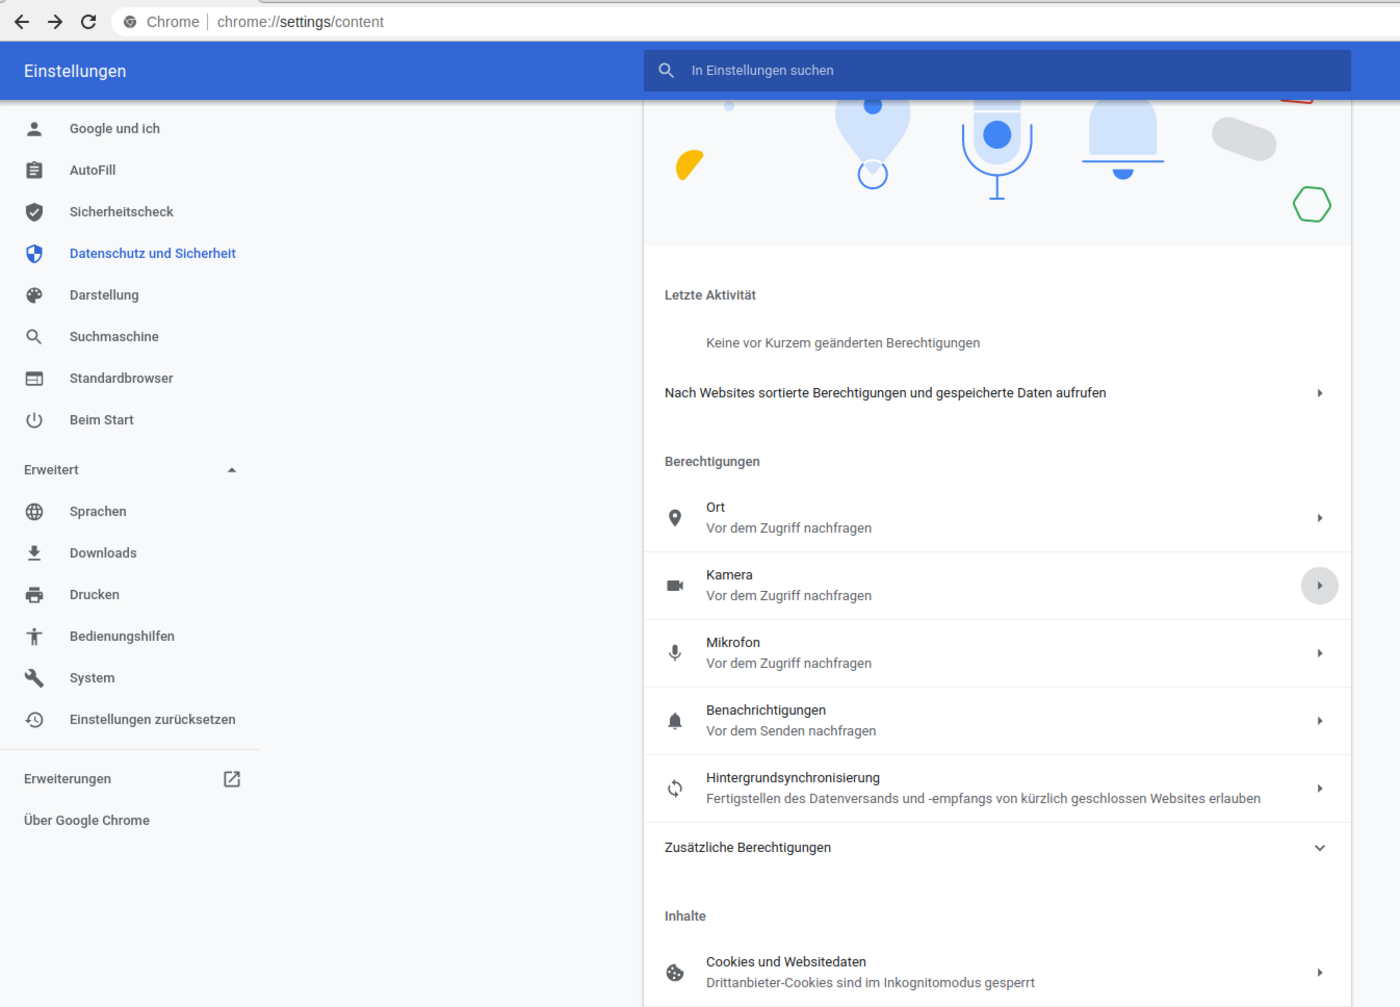
Chrome browser
- In Chrome, open "Recruitment" and select "Data protection and security" on the left-hand side
- Click on "Website settings" on the right or simply open this URL: chrome://settings/content
- There you will find the server-dependent recruitments for your devices (e.g. camera and microphone)
- Allow access for the corresponding servers to the corresponding devices
If the image and/or audio quality is poor or you notice dropouts, this can have various causes:
- Your internet connection or the internet connection of the presenter is generally slow, overloaded or disrupted
The upload speed is also important here, i.e. how fast the data can be uploaded from your connection to the network, 10 Mbit/s is recommended.
Please also check whether other members of your environment are using the connection at the same time.
Observe whether the connection quality varies at different times of the day (provider networks are often more heavily workloaded in the evening due to streaming). - Often the internal WiFi connection in your environment is also the cause of high latency and therefore poor quality
If possible, try connecting your end device using a network cable - Check your own hardware (processor speed, microphone, camera)
A processor that is too slow can be responsible for dropouts, especially with several parallel camera streams.
Cheap end devices often have cheap microphones installed that do not offer good quality, so please use an external headset.
Clothing
Just like lectures and seminars, online events are to be understood as a professional setting. You should therefore also wear a shirt or blouse and, if necessary, a jacket in online events.
Gestures and language
As the event is being held "live", you should pay attention to calm gestures and emphasised language. This also has the advantage that recordings can be better understood. Talking through the slides in advance is particularly helpful for beginners.
Create a rough storyboard
It is helpful to create a storyboard so that you can plan your online event better. Interaction usually falls by the wayside when combining a lecture/question and answer session. The storyboard allows you to clarify thematic connections, plan interactions in a targeted manner (e.g. comprehension questions, examiner of conceptual knowledge) and integrate productive group work.
Sound
Good sound is essential for a good online event. Therefore, check your microphone in advance and pay particular attention to the distance to the mouth (volume) and background noise. As most built-in microphones are of rather poor quality or do not have an optimal distance to the spokesperson, we recommend using a headset or a table microphone. If the sound is too quiet or not audible at all, check in the system settings of your operating system whether the correct microphone is selected by default. In a second step, we also recommend using the Adobe Connect "Audio Setup Wizard".
Camera
In addition to a good sound, a good image is also conducive to creating a positive overall impression. You should make sure that your camera has the ability to record in 720p (HD) and at least 30 frames per second. This warrants that the image arrives at the participants cleanly and smoothly. You should also pay attention to the quality of the image, especially with built-in cameras. If there are artefacts such as image noise, poor focus or images that are too bright or too dark, you can try to improve the image by using better light. If the image does not improve significantly, we recommend purchasing separate webcams (e.g. from Microsoft or Logitech), which can provide a better image.
Light
If you are also using the video function, make sure you have good lighting that shines on it from the front if possible (a combination of ceiling and lamp light if necessary). This will reduce the image noise of your camera and you will be able to see the students better. Also make sure that there is no light source behind you if possible. It is also advisable to choose a low-distraction background.
Desktop
Clear your computer desktop if you plan to share your screen. If studies can see it, this leaves a professional impression.
Technical check
Do a technical check before the event. Check that the microphone, camera and desired functions are working correctly. A second person (e.g. the tutor) is helpful here.
Bandwidth
If you have poor bandwidth, you can reduce the bandwidth under "Meetings/Preferences/Bandwidth". This is also useful if participants with a poor connection are connected.
Interactions can be used to increase the activity of the participants, to make their conceptual knowledge visible or to work productively on current content-related questions.
Various formats can be realised using BigBlueButton. Voting, for example, is suitable for conducting anonymous votes. This is particularly useful if you want to check the understanding of a specific content issue and intervene if necessary.
Incorporate elements of reflection into your online event to give participants time to organise their new knowledge. For example, a short coffee break in which participants are asked to reflect on issues by transferring them to their private budget (as a current setting).
Another option could be a so-called one-minute paper, in which the participants are asked to write down what they have understood within a set time frame. This allows them to reflect on what they have heard and the teachers to recognise any misconceptions.
For studies
All students who want to exchange ideas with each other or hold meetings with external participants (e.g. discussing a Bachelor's thesis with the company) use the study group function:
- In StudIP, go to "Events"
- Select "Create new study group" in the left-hand menu
- Tick the "Meetings" box under "Content elements"
- The newly created study group is now listed under "Events" under the "My study groups" tab
- Select study group
- Click on the "Meetings" tab and create a new meeting room
- Select "Access via link" under Authorisations
- Enter room


